1. Overview
Describes methods allows to integration with PayTool solution. Prior to using this solution you have to proceed onboard process. To create account please contact with support.
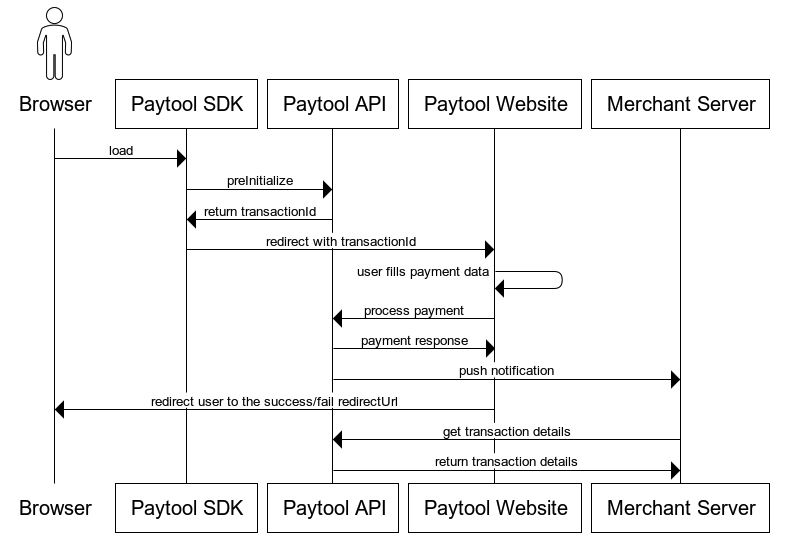
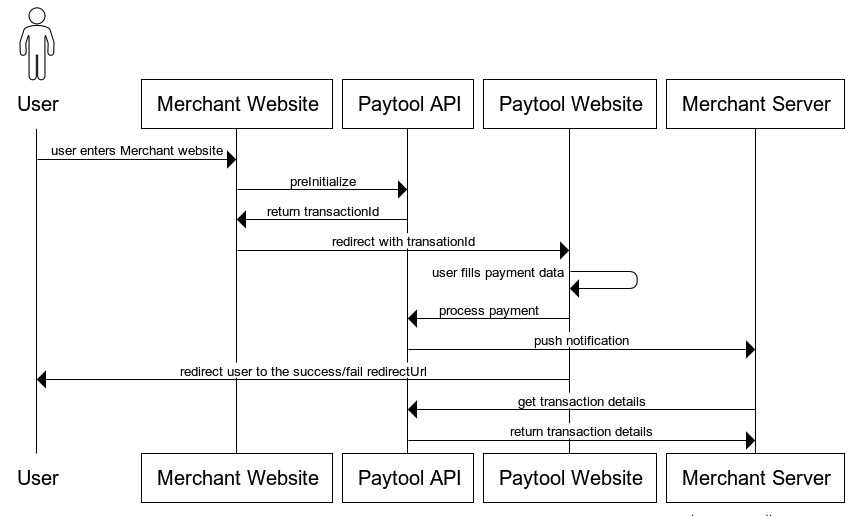
The PayTool solution provides two integrations models:
2. Integration
2.1. SDK

The merchant-paytool.js is a JavaScript-based client-side SDK for Merchant PayTool.
The SDK adds MerchantPayTool class to the global JavaScript scope which can be further instantiated to start PayTool’s payment process.
Alternatively, it also defines a custom element called merchant-paytool for a more straightforward, plug-and-play solution.
An optional step is to send a transaction status notification to the Merchant Server. Details of the notification are described in the section: postbacks.
Additionally, the PayTool SDK provides a method that allows you to get transaction details using transactionId.
2.1.1. API Reference
Initialization Add the following script to your website:
<script type="module" src="https://merchant-paytool.verestro.com/merchant-paytool.js"></script>| The type="module" attribute is currently required, because the SDK utilizes modern JavaScript code splitting syntax. |
2.1.2. SDK Methods
init
(class approach only)
Starts PayTool’s payment process using the provided data.
After successful initialization, resolves a promise and redirects to PayTool’s website.
Rejects a promise if any error occurs.
Parameters
Data
Init Data
Returns
Promise<void>
Interfaces
Init Data
Data object passed to PayTool’s backend API.
| Name | Type | Description |
|---|---|---|
apiKey |
string |
Merchant identifier, given during onboarding. |
amount |
number |
Transaction amount in the lowest unit of money, fe. cents for USD. |
currency |
string |
Transaction currency code. |
description |
string |
Short description of transaction. |
redirectUrls |
object? |
Optional return url object. If not provided, urls from merchant’s config will be used instead.PayTool might append additional query parameters to the urls, fe. a transaction identifier. |
redirectUrls.successUrl |
string? |
The url where users will be redirected after a successful payment. |
redirectUrls.failureUrl |
string? |
The url where users will be redirected after a failed payment. |
Examples
The SDK offers different ways to initialize a payment. It can do most of the heavy lifting by itself, including UI, but it also exposes a lower-end API to let you customize your UX.
There are 2 supported approaches:
Class approach
Angular
import { Component } from '@angular/core';

@Component({
  selector: 'app-root',
  template: '<button (click)="onClick()">Pay</button>',
})
export class AppComponent {
  payTool = new MerchantPayTool();

  onClick() {
    this.payTool
      .init({
        apiKey: 'YOUR_API_KEY',
        amount: 9999,
        currency: 'CURRENCY_CODE',
        description: 'TRANSACTION_DESCRIPTION',
        redirectUrls: {
          successUrl: 'YOUR_SUCCESS_URL',
          failureUrl: 'YOUR_FAILURE_URL'
        }
      })
      .catch(console.log);
  }
}
React
export const App = () => {
  const payTool = new MerchantPayTool();
  return (
    <button
      onClick={() => {
        payTool
          .init({
            apiKey: 'YOUR_API_KEY',
            amount: 9999,
            currency: 'CURRENCY_CODE',
            description: 'TRANSACTION_DESCRIPTION',
            redirectUrls: {
              successUrl: 'YOUR_SUCCESS_URL',
              failureUrl: 'YOUR_FAILURE_URL'
            }
          })
          .catch(console.log);
      }}>
      Pay
    </button>
  );
};
Plain JavaScript
<!DOCTYPE html>
<html lang="en">
  <head>
    <meta name="viewport" content="width=device-width, initial-scale=1.0" />
    <script
      type="module"
      src="https://merchant-paytool.verestro.com/merchant-paytool.js"
    ></script>
  </head>
  <body>
    <button id="pay-btn">Pay</button>
    <script>
      var payButton = document.getElementById('pay-btn');
      payButton.addEventListener('click', function () {
        var payTool = new MerchantPayTool();
        payTool
          .init({
            apiKey: 'YOUR_API_KEY',
            amount: 9999,
            currency: 'CURRENCY_CODE',
            description: 'TRANSACTION_DESCRIPTION',
            redirectUrls: {
              successUrl: 'YOUR_SUCCESS_URL',
              failureUrl: 'YOUR_FAILURE_URL'
            }
          })
          .catch(console.log);
      });
    </script>
  </body>
</html>
Web Component approach
This approach focuses on modern solutions to help your integrate with PayTool as fast as possible and keep your code clean, providing a pre-built "Click to Pay" button. The component accepts data as Init Data, similarly to the init method.
Angular
import { Component } from '@angular/core';

@Component({
  selector: 'app-root',
  template: '<merchant-paytool [data]="data"></merchant-paytool>',
})
export class AppComponent {
  data = {
    apiKey: 'YOUR_API_KEY',
    amount: 9999,
    currency: 'CURRENCY_CODE',
    description: 'TRANSACTION_DESCRIPTION',
    redirectUrls: {
      successUrl: 'YOUR_SUCCESS_URL',
      failureUrl: 'YOUR_FAILURE_URL',
    },
  };
}
React@^18
export const App = () => {
  return (
    <merchant-paytool
      ref={el => {
        if (el) {
          el.data = {
            apiKey: 'YOUR_API_KEY',
            amount: 9999,
            currency: 'CURRENCY_CODE',
            description: 'TRANSACTION_DESCRIPTION',
            redirectUrls: {
              successUrl: 'YOUR_SUCCESS_URL',
              failureUrl: 'YOUR_FAILURE_URL'
            }
          };
        }
      }}
    />
  );
};
React@experimental
export const App = () => {
  return (
    <merchant-paytool
      data={{
        apiKey: 'YOUR_API_KEY',
        amount: 9999,
        currency: 'CURRENCY_CODE',
        description: 'TRANSACTION_DESCRIPTION',
        redirectUrls: {
          successUrl: 'YOUR_SUCCESS_URL',
          failureUrl: 'YOUR_FAILURE_URL'
        }
      }}
    />
  );
};
Plain JavaScript
export const App = () => {
  return (
    <merchant-paytool
      data={{
        apiKey: 'YOUR_API_KEY',
        amount: 9999,
        currency: 'CURRENCY_CODE',
        description: 'TRANSACTION_DESCRIPTION',
        redirectUrls: {
          successUrl: 'YOUR_SUCCESS_URL',
          failureUrl: 'YOUR_FAILURE_URL'
        }
      }}
    />
  );
};
2.2. API

The PayTool API allows you to perform the Paytool’s payment process.
The first step is to initialize the payment using method: PreInitialize. Then, the Merchant Website should redirect the user to the Paytool Website with the transactionId obtained in the first step. Redirect url should build according to schema described in section: Endpoints for PayTool Website. Next step, on the PayTool side the payment process will be executed. When it is finished, the user will be redirected to the address specified by the Merchant in the method: PreInitialize.
An optional step is to send a transaction status notification to the Merchant Server. Details of the notification are described in the section: postbacks.
Additionally, the PayTool API provides a method that allows you to get transaction details using transactionId.
3. Paytool Details
3.1. Endpoints
This section describes the endpoints for PayTool API integration model.
3.1.1. Endpoints for PayTool API
Endpoint for PayTool API contains description of endpoints for Paytool API methods.
Environment |
Endpoint |
Beta |
|
Production |
3.1.2. Endpoints for PayTool Website
Endpoint for PayTool Website contains description of endpoints to which the user should be redirected by Merchant Website to execute the payment process in PayTool.
Path variable: transactionId contains the transaction identifier obtained from the method: PreInitialize.
Environment |
Endpoint |
Beta |
|
Production |
3.2. Postbacks
If merchant wants to handle notifications after transactions merchant must create HTTP POST endpoint which will accept requests in format JSON.
| Your server after receiving request must return HTTP status 200 OK. Otherwise, server will retry the request. |
Request:
POST site.merchant.com/notifications HTTP/1.1
Content-Type: application/json
Content-Length: 265

{
  "transactionId": "3a1e9961-75bc-4279-8791-033c180fa239",
  "status": "DEPOSITED",
  "amount": 100,
  "currency": "USD",
  "description": "description"
}
Request headers:
Type |
Value |
Constraints |
Description |
Content-Type |
application/json |
Required |
Content type of request |
Request fields
Parameter |
Type |
Constraints |
Description |
transactionId |
String |
Required |
Unique Id of transaction |
status |
String |
Required |
Transaction status. AUTHORIZED, DEPOSITED, FAILED, UNKNOWN, REFUNDED, REVERSED |
amount |
Number |
Required |
Amount for transaction (minor units of currency) |
currency |
String |
Required |
Currency of given amount |
description |
String |
Required |
Simple description of transaction |
Response:
HTTP/1.1 200 OKExamples:
$ curl 'https://site.merchant.com/notifications' -i -u 'login:password' -X POST -H 'Content-Type: application/json' -d '{

  	"transactionId": "387cd038-fa39-40e1-a6ac-0d610b594787",
    "status": "DEPOSITED",
  	"amount": 100,
  	"currency": "USD",
  	"description": "description",
}'
3.3. Methods
3.3.1. PreInitialize
| This method is only required for integration model: PayTool API |
| Method require authorization with api-key. Value api-key is send in header: X-API-KEY. The API Key is issued to the client during the onboarding process. |
| The PayTool’s payment process can send post-payment notifications to the Merchant’s server. You can find more information about notifications here: Postbacks |
The method allows to preInitialize PayTool’s payment. The method returns transactionId which will be used step during the process.
Request:
POST /champion/web/payment/preInitialize HTTP/1.1
Content-Type: application/json
X-API-KEY: test_9d102010-f412-4482-be9d-1889aca681c4
Host: merchant.upaid.pl
Content-Length: 312

{
  "amount": 110,
  "currency": "PLN",
  "description": "Simple description of transaction",
  "redirectUrls": {
    "successUrl": "https://successurl.upaid.pl",
    "failureUrl": "https://failureurl.upaid.pl"
  },
  "mid": "4fb7977a-20a8-458c-b9f3-212906b1b9b0",
  "itemId": "itemId",
  "receiverAmount": 100
}
Request headers:
Type |
Value |
Constraints |
Description |
Content-Type |
application/json |
Required |
Content type of request |
X-API-KEY |
55b7fdc7-3d26 |
Required |
API-KEY value |
Request fields:
| Path | Type | Constraints | Description |
|---|---|---|---|
amount |
Number |
Required |
Transaction amount |
currency |
String |
Required |
Transaction currency |
description |
String |
Required |
Simple description of transaction |
redirectUrls |
Object |
Optional |
RedirectsUrl Object |
redirectUrls.successUrl |
String |
Optional |
The URL where the user will be redirected after successful payment. Can be given during onboarding. |
redirectUrls.failureUrl |
String |
Optional |
The URL where the user will be redirected after failure payment. Can be given during onboarding. |
mid |
String |
Optional |
Identifier of mid. If not supplied default value will be selected. |
itemId |
String |
Optional |
Merchant’s unique id of transaction. |
receiverAmount |
Number |
Optional |
Amount without Merchant’s commission |
Response:
HTTP/1.1 200 OK
Content-Length: 62
Content-Type: application/json;charset=UTF-8

{
  "transactionId" : "fab418a2-230e-48e4-8231-ffdda1950c61"
}HTTP/1.1 400 Bad Request
Content-Length: 32
Content-Type: application/json;charset=UTF-8=
{
"status": "VALIDATION_ERROR",
"message": "Some fields are invalid",
"data": [
{
"field": "{{field_name_from_request}}",
"message": "{{message}}"
}
],
"traceId": "{{traceId}}"
}HTTP/1.1 422 Unprocessable Entity
Content-Length: 32
Content-Type: application/json;charset=UTF-8=
{
"status": "ERROR_ITEM_ID_IS_LOCKED",
"message": "ERROR_ITEM_ID_IS_LOCKED",
"traceId": "{{traceId}}"
}HTTP/1.1 401 Unauthorized
Content-Length: 32
Content-Type: application/json;charset=UTF-8=
{
"status": "ERROR_BAD_API_KEY",
"message": "ERROR_BAD_API_KEY",
"traceId": "{{traceId}}"
}HTTP/1.1 500 Internal Server Error
Content-Length: 32
Content-Type: application/json;charset=UTF-8=
{
"status": "INTERNAL_SERVER_ERROR",
"message": "Internal server error exception",
"traceId": "{{traceId}}"
}Response fields:
| Path | Type | Description |
|---|---|---|
|
|
Transaction identifier |
Examples:
$ curl 'https://merchant.upaid.pl/champion/web/payment/preInitialize' -i -X POST \
    -H 'Content-Type: application/json' \
    -H 'X-API-KEY: test_9d102010-f412-4482-be9d-1889aca681c4' \
    -d '{
  "amount": 110,
  "currency": "PLN",
  "description": "Simple description of transaction",
  "redirectUrls": {
    "successUrl": "https://successurl.upaid.pl",
    "failureUrl": "https://failureurl.upaid.pl"
  },
  "mid": "4fb7977a-20a8-458c-b9f3-212906b1b9b0",
  "itemId": "itemId",
  "receiverAmount": 100
}'
3.3.2. Get transaction details
Method allows getting transaction details using transactionId. To use this method you need to pass BasicAuth.
Request:
GET /champion/transactions/cd000c27-282d-4f2a-bea2-f1e15df0bcd5 HTTP/1.1
Authorization: Basic bG9naW46cGFzc3dvcmQ=
Content-Type: application/json
Host: merchant.upaid.pl
Request headers:
Type |
Value |
Constraints |
Description |
Content-Type |
application/json |
Required |
Content type of request |
Authorization |
Basic bG9naW46cGFzc3dvcmQ= |
Required |
Basic Authorization token |
Response:
HTTP/1.1 200 OK
Content-Type: application/json;charset=UTF-8
Content-Length: 268

{
  "transactionId" : "cd000c27-282d-4f2a-bea2-f1e15df0bcd5",
  "amount" : 100,
  "currency" : "PLN",
  "description" : "description",
  "bin" : "4442211",
  "lastFourDigits" : "1234",
  "status" : "DEPOSITED",
  "threeDsMode" : "FRICTIONLESS",
  "itemId" : "itemId"
}
Response fields:
| Path | Type | Description |
|---|---|---|
|
|
Transaction Id |
|
|
Transaction amount in pennies |
|
|
Transaction currency |
|
|
Transaction description |
|
|
Card bin |
|
|
Card last four digits |
|
|
Transaction Status. Possible values: DEPOSITED - transaction finished with success INITIALIZED_3DS - transaction during processing FAILED - transaction failed |
|
|
ThreeDS process mode which informs about |
|
|
Merchant’s unique id of transaction. |
Error Status |
Http Status |
TRANSACTION_NOT_FOUND |
400 - Bad Request |
Examples:
$ curl 'https://merchant.upaid.pl/champion/transactions/cd000c27-282d-4f2a-bea2-f1e15df0bcd5' -i -u 'login:password' -X GET \
    -H 'Content-Type: application/json'